HUB GEAR INDICATOR ADJUSTMENT
The indicator rod of three-speed hubs should be adjusted when the
control lever is in the normal gear position, i.e., No. 2. The small
locknut above the chain is first slackened off and then the knurled wire
connection is rotated so as to bring the rod into the required position.
With SW, SB, SG, AM, ASC and AC hubs the required position has been
obtained when the end of the indicator rod is level with the end of the
axle on the left-hand side of the hub.
With AW, AB, AG and TCW hubs it is brought into position by bringing
the outer shoulder of the indicator rod level with the end of the axle
on the right-hand (sprocket) side. (See B in illustrations.)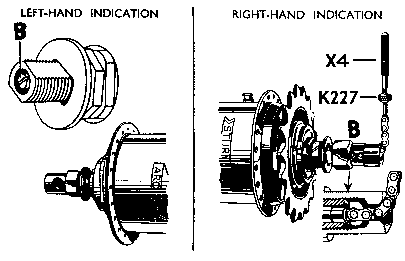
For four-speed hubs, FW, FM, FC and FG, adjustment is made when the
control lever is in the low gear, i.e., No. 2 position (the one next to
the bottom gear position). The locknut is slackened off and the knurled
wire connection is revolved to bring the end of the indicator rod level
with the end of the axle on the left-hand side. (See B in illustration.)
In all cases the locknut must be tightened again after adjustment. If
the knurled wire connection cannot be turned enough to give the required
adjustment of the indicator rod, the position of the fulcrum (in the
case of trigger controls), or the quadrant (in the case of top tube
controls) should be moved along the top tube in the required direction,
so that the final adjustment may be made on the wire connection as
described. At the first sign of the gear slipping in any position, the
indicator adjustment must be checked
HUB BEARING ADJUSTMENT
The hub bearings are adjusted by means of the cone on the left-hand
side (opposite side to the sprocket) which automatically adjusts all the
hub bearings. It should be adjusted so that there is a barely
perceptible sideways movement of the wheel rim.
With brake hubs the left-hand cone projects through the brake plate
and is fitted with a slotted adjustment washer. With a rear 'Dynohub'
the left-hand cone projects through the armature and is fitted with a
slotted adjustment washer. Turning the washer adjusts the cone, which
must be locked again with the locknut after adjustment.
When a dynamo is incorporated in the hub the pull of the magnet
disguises the adjustment and if this point is not kept in mind the wheel
may be over-tightened and the ball races damaged. The position of the
armature terminals should be carefully located before the cone locknut
is finally tightened.
For all hubs fitted to roadster cycles, the terminals should be
parallel to one of the flats on the end of the axle but with forward
drop-out lugs they should be turned clockwise through 30° away from
a position parallel with the flats.
GH6 lighting sets should have the terminals parallel with the axle
flats. The notched washer has not been fitted to GH6 hubs since 1954
when the adjusting cone was transferred to the side away from the
'Dynohub'.
Before spinning a wheel to test the output of the 'Dynohub', ensure
that the axle nuts are tight, otherwise the terminals may foul the front
fork and be damaged if the axle revolves.
The right-hand cone (on the sprocket side) is fixed in position when
the hub is assembled and must not be disturbed for wheel adjustment in
the normal way. When re-assembling the hub after dismantling for
inspection or repair, the right-hand cone should be screwed home until
it is finger-tight, then unscrewed half a turn and finally locked with
the special lockwasher and locknut. On no account should it be unscrewed
more than half a turn as this will upset the setting of the gears. Wheel
adjustment is then made in the normal way with the left-hand cone. If
the right-hand cone races are being inspected without removing the
internals from the hub shell, the left-hand cone must first be screwed
well back so that it does not interfere with the re-setting of the
righthand cone.
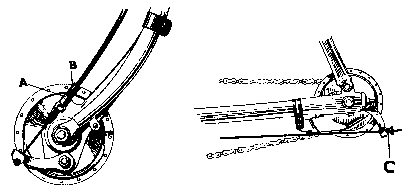
HUB (BRAKE) ADJUSTMENT
 When
brakes are new they may have to be adjusted frequently (until the shoes
have become properly bedded in).
When
brakes are new they may have to be adjusted frequently (until the shoes
have become properly bedded in).
With cable-operated brakes the small locknut (A in the diagram) is
first slackened off and then the knurled adjuster (B in diagram) is
tightened until the brake shoes are felt to be rubbing on the inner
surface of the hub shell. The adjuster is then slackened just enough to
allow the wheel to revolve without friction, and the locknut is
tightened up again.
With rod-operated brakes the adjuster (C in the diagram) is turned
until the brake shoes rub on the inside of the drum, and then slackened
off just enough to allow the wheel to revolve without friction. The
adjuster is self-locking This is the only point at which the brake
should be adjusted. The handlebar brake tubes are only provided to allow
up-and-down adjustment of the handlebars.
Back to Sturmey stuff