S3C Tricoaster Hub
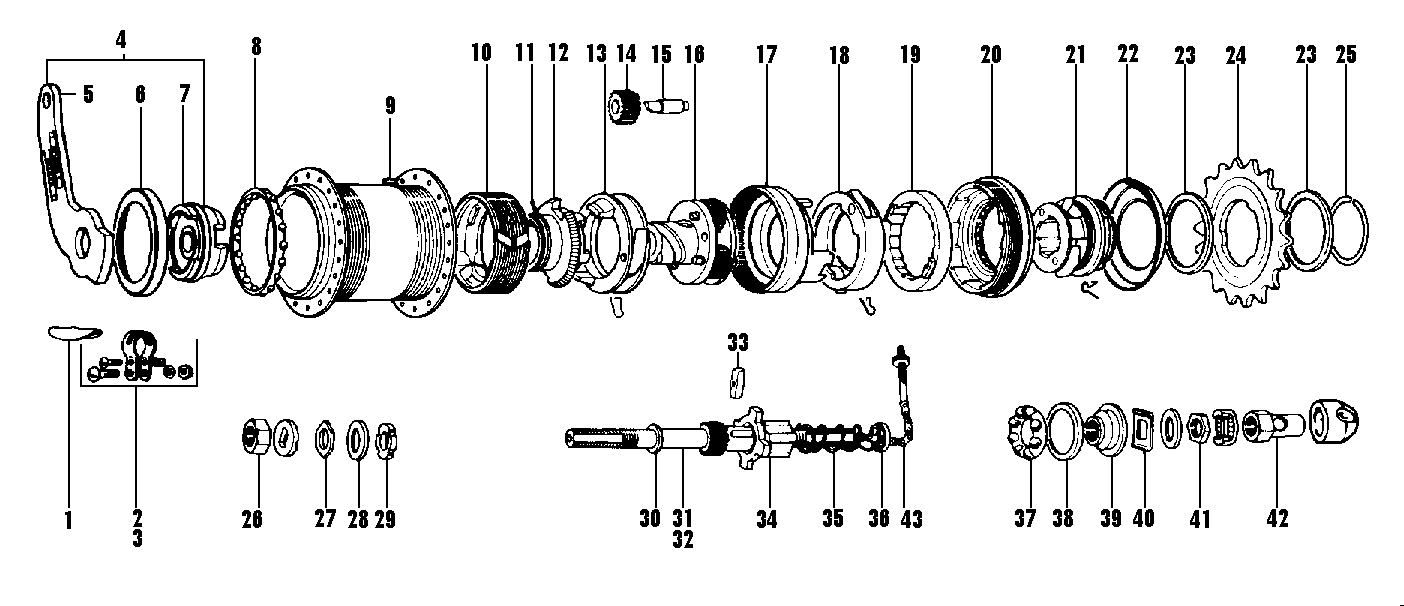
A NEW HUB MUST BE OILED BEFORE USE through the lubricator on the hub
shell. Afterwards add a few drops of oil every month. USE ONLY
STURMEY-ARCHER OIL - DO NOT use thick oil or grease.
TO DIS-ASSEMBLE THE S3C HUB
- Place sprocket end of axle in a vice. Remove left-hand locknuts 26
and 27, lockwasher 28 and adjuster nut 29. Lift off brake arm and cone
assembly 4. Take out ball retainer 8 and brake band 10 from hub shell.
- Unscrew right hand ball ring 20 (use hammer and punch). Remove unit
from vice and withdraw gear from hub shell.
- Remove the brake thrust plate 12 and planet cage pawl ring 13.
- Place left hand end of axle in a vice and remove right hand wheel nut
42, wheel washer, cone locknut 41. Unscrew cone 39.
- Lift off clutch spring cap 36, spring 35, driver assembly 21, ball
ring 20. ratchet ring 19, gear ring pawl ring 18 and gear ring 17.
- Unscrew gear indicator coupling 43, lift off clutch 34 and remove
axle key 33.
- Take out planet pinion pins 15 and remove planet pinions 14.
- Remove axle from vice, push off circlip 30 from left end of axle and
lift off planet cage 16.
POINTS TO CHECK
- Axle for straightness.
- All gear teeth for wear.
- All races for wear.
- All pawls and ratchets for wear.
- Pinion pins, sliding clutch, driver and gear ring splines, planet
cage dogs and cam surfaces - for wear.
- Check engagement areas of brake thrust plate and gear ring and
ratchet ring.
- Eliminate all movement of brake arm in its recess in left cone - if
either component is damaged ( i.e. chipped) replace with new part. NOTE
- the brake arm is a press in fit and must remain tight in cone recess.
- All dust caps for damage in - left and right cones - right hand ball
ring and driver.
TO ASSEMBLE THE S3C HUB
Prepare in advance the following sub-assemblies:-
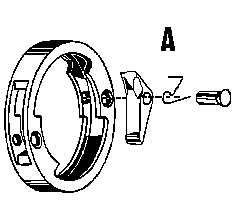
 GEAR
RING ASSEMBLY (A)- Fit gear ring pawls, pins and springs. Rivet the pawl
pins securely in position.
GEAR
RING ASSEMBLY (A)- Fit gear ring pawls, pins and springs. Rivet the pawl
pins securely in position.
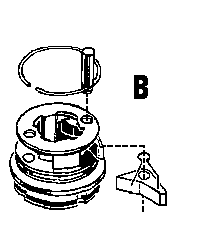
DRIVER ASSEMBLY (B)- Assemble brake operating pawls, springs, pins and
circlip in driver. Assemble sprocket dust cap, spacing washers and
sprocket in arrangement noted when dismantling the hub, and add circlip.
Fit the ball retainer 37 into the driver 21 - (The ring of retainer facing
outwards) and fit dust cap 38 - fill dust cap with Shell Alvania No. 3
grease.
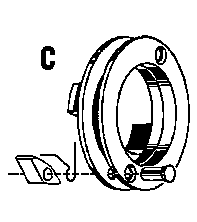
PLANET CAGE ASSEMBLY (C)- Fit planet cage pawls, pins and springs. Rivet
the pawl pins securely in position.
BALL RING ASSEMBLY - Fit 24 ( 3/16" diam) ball bearings in ball
race of right hand ball ring 20. Fill the ball track with Shell Alvania
No. 3 grease and press in the inner dust cap. Make sure the bearings
revolve freely after dust cap has been fitted.
BRAKE ARM AND CONE ASSEMBLY - Place dust cap 6 over left hand cone 7,
and press brake arm 5, tightly into cone slots NOTE-
''Sturmey-Archer'' name must face outwards. Smear grease - use Shell
Alvania No. 3 - in the ball track of the left hand cone - (inside the hub
shell) .
- Hold the right-hand end of the axle in a vice - the slot for the axle
key below the sun pinion - and fit the planet cage 16 - actuator thread
uppermost - and push circlip 30 into axle groove. Reverse axle in vice,
add the planet pinions 14, and pins 15, making sure than the D shape
ends of the pins are facing downwards.
- Fit axle key 33 into axle slot (with the hole of the key facing
upwards), slide clutch 34 over axle and key, and screw gear indicator
rod 43 into key.
- Fit the gear ring 17 and the previously prepared gear ring assembly.
Ensure that the heads of the pawl pins are facing upwards.
- Insert the ratchet ring 19 into the right hand ball ring 20 and place
these over the gear ring assembly. (Ratchet ring dogs MUST
engage gear ring).
- Fit the previously prepared driver assembly.
- Slide the clutch spring 35 over the axle and fit spring cap 36.
- Screw the right-hand cone 39 on to axle (finger tight), then slacken
half a turn (180°) and lock in position with the washer 40 and
locknut 41. N.B. Do not unscrew cone more than 5/8 of a turn, as
that would throw the gear mechanism out of adjustment.
- Reverse the assembled mechanism in the vice. Locate previously
prepared planet cage assembly over the flats on the pinion pins.
- Fit the brake thrust plate 12 - IMPORTANT - ensure leg of
brake actuating spring faces outwards, also the thrust plate must ENGAGE
FULLY the dogs on planet cage pawl ring 13.
- Fit the brake band 10 - (the inner band projections must face
uppermost) over brake thrust plate 12.
- Remove the assembled mechanism from the vice. Hold the cycle wheel
horizontally - insert the assembled mechanism into hub shell from below
and screw in the right hand ball ring 20. (Use hammer and punch to
tighten ball ring).
- Fit ball retainer (with balls down) in left hand ball race. Fit the
left - hand cone and brake arm assembly 4. NOTE- Make sure that
the brake band projections and actuating spring leg fit into their
respective slots in the cone - i.e. spring leg in narrow slot at 90°
to large slot.
- Screw the adjuster nut 29 on to axle (finger tight) . Fit the
lockwasher 28 and locknut 27 - (Adjust the hub bearing). A correctly
adjusted wheel has a trace of side-play at the rim - none at the hub.
N.B. Secure adjuster nut 29 after adjustment - centre punch
lockwasher 28 over the slot in adjuster nut 29. Tighten locknut 27.
- Replace the wheel in the cycle frame. Secure FIRMLY, the
brake arm clip 2 on left-hand chainstay of cycle. (N.B.
Strengthening Pad 1 is fitted on top of chainstay - Sports Machines). Do
not twist the brake arm sideways when tightening clip. Adjust the gears.
GEAR ADJUSTMENT
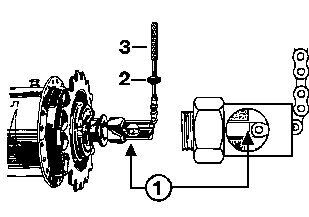
Place the gear control in No. 2 position. Screw the cable
connection 3, until the end of the indicator rod is exactly level with the
extreme end of the axle. This can be seen through the "window"
in the right hand nut 1. Now tighten locknut 2. ALL GEARS ARE NOW SET.
NOTE - When the brake is applied in No. 3 (High) gear only - the
gear indicator coupling will move outwards - slightly. This is caused by
the clutch - to which the indicator is keyed - sliding backwards over the
ramps on the planet cage. Immediately the brake is released, the clutch
moves down the ramp again to drive forward.
Back to Sturmey Stuff