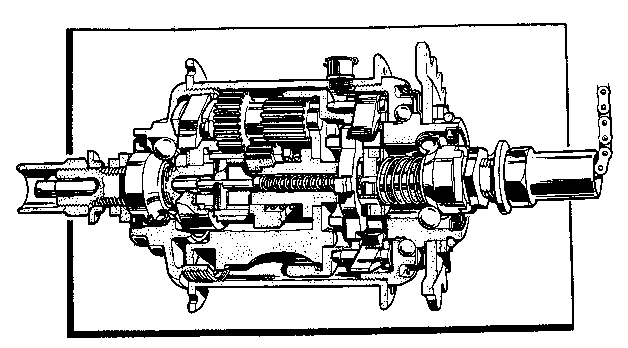
The FW Hub:

To dismantle:
- Remove the indicator from the hub and remove the internal from the
hub shell as described in the general
instructions.
- Place the left-hand end of the axle in a vice and remove the right
hand locknut, washers if any, the cone lock washer and the right hand
cone, making a note of their arrangement so that they can be replaced
in their original positions.
- Lift off, in the following order, the clutch spring and cap, the
driver, the right-hand ball ring and the gear ring.
- Remove the thrust washer and ring. Push out the axle key and remove
the clutch sleeve and sliding clutch.
- Push out the pinion pins and remove the pinions and planet cage.
- The low gear pawl pins are riveted in position. If they have to be
removed, file the riveted part flat and knock out the pins with a
small punch. The pawls and springs can then be removed.
- Remove axle from vice. The internal compensating spring, complete
with collar, can now be taken out of the right-hand end of the axle.
- Place the right-hand end of the axle in a vice, straighten the
edges of the tab washer, and remove the nut and tab washer holding the
internally toothed dog ring. Remove the dog ring.
- Push the two sun pinions along the axle so that the larger one
engages with the axle dogs and move the sleeve under the smaller one
in the opposite direction in order to expose the second axle key. Push
out this axle key.
- Slide the two sun pinions, sleeve and spring off the axle.
- If necessary, because of a worn bearing surface or ratchets, the
left-hand ball cup may be removed. It has a left-hand thread and is
removed by gripping the outside flat surfaces in a vice and spinning
the wheel in a clockwise direction.
- The channel-section dust caps in the driver and the left-hand ball
cup are pressed into position and can be prised out with a wide
screwdriver. It is recommended that a new dust cap be fitted if a new
ball retainer and balls have to be fitted.
Re-Assembly
- If the left-hand ball cup has been removed from the hub shell,
replace it by screwing anti clockwise because it has a left-hand
thread.
- Prepare the following preliminary sub-assemblies:
- Fit the ball cage into the left-hand ball cup, with the ring of
the ball-retainer facing outwards and the recess in the dust cap
also facing outwards. If a new ball-retainer is being fitted, the
dust cap also should be new.
- Fit the ball cage into the driver, with the ring of the ball
retainer facing outwards and the recess in the dust cap also
facing outwards. If a new ball-retainer is being fitted, the dust
cap also should be new. If the sprocket has been removed, see No.
19 below.
- Fit the balls (only 24) and the inner dust cap to the
right-hand ball ring, making sure that the balls can revolve
freely with the dust cap in place.
- Fit the pawls, pins and springs into the gear ring as described
in the general instructions to 'The
Re-assembling of Sturmey Archer Hubs.'
- Fit the pawls, pins and springs into the planet cage and rivet
the pins on the left-hand (ball cup) side as described in the
general instructions to 'The Re-assembling
of Sturmey-Archer ' Hubs.'
- Smear grease in the channels of the dust caps of the left-hand
ball cup and the driver and in the recess of the right-hand ball
ring. Do not use grease anywhere else.
- Working from the left-hand (short slot) side of the axle, slide the
low gear spring, the primary sun pinion, and the secondary sun pinion
and sleeve on to the axle in that order, and push them along until the
dogs engage. (The low-gear spring, the compensating spring, and the
clutch spring of a four-speed hub must be of the same series. If one
has been replaced, the other two must be.)
- Holding the pinions in position, withdraw the secondary sun pinion
sleeve until the low-gear keyhole is exposed, and insert the low- gear
key making sure that the hole through the key is in line with the bore
of the axle. Release the pinions, so that they can spring back and
secure the key. Use the indicator rod to check that the hole in the
low-gear key is still in line with the axle bore.
- Fit the dog ring so that it engages on the axle square, and secure
it with the washer and nut, spanner-tight. Then turn down the edge of
the lock washer over two opposite sides of the locknut, to secure it.
(Earlier models of this hub may not be fitted with tab lock washers.)
Drop the indicator rod down the axle to check that the end of the
indicator rod comes level with the end of the axle.
- Remove the indicator, then hold the axle vertically in a vice by
the flats on the left-hand end, and put the planet cage in place.
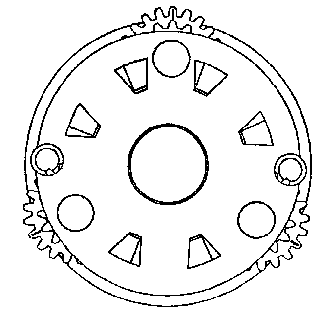
- Add the double planet pinions and pins so that they engage with the
two sun pinions. The marked teeth must in each case point radially
outwards, as shown in the drawing, or the hub will not be correctly
timed. (Notice also that three teeth on the small end of each planet
pinion are visible over the end of the planet cage.) To check the
timing, engage the gear ring with the pinions and rotate several
times. It should rotate quite freely. Remove gear ring after testing.

- Drop the compensator spring down the axle, collar first.
- Fit the clutch sleeve (flange first), the sliding clutch with the
recess over the flange of the sleeve, the key and the thrust ring and
thrust washer. The notches on the thrust ring must engage with the
flats on the key.
- Remove the axle from the vice and insert the indicator chain and
coupling into the right-hand end, threading it through the main key
and the compensator spring collar.
- Insert the indicator rod, and press the left-hand end of the axle
and indicator rod against a solid surface while holding the assembled
mechanism vertically and pressing downwards on the sliding clutch, so
that the indicator coupling can be screwed to the indicator rod. When
the chain is felt to be fully screwed home insert a small
screwdriver into the slot of the indicator rod and exert a slight
(rotatory) pressure on the chain, to make sure that the indicator rod
is tight, taking care not to twist off the small threaded end. Make
sure that the sliding clutch is free to move along the axle when.the
indicator chain is moved up and down.
- Fit the gear ring, the right-hand ball ring, the driver, the clutch
spring, and the clutch-spring cap, in that order.
- Fit the right-hand cone and screw it up finger-tight. Then
slacken it back half a turn and lock it in that position with the
special locking washer and locknut. On no account must the cone be
unscrewed more than half a turn, as that would throw the gear
mechanism out of adjustment.
- Hold the assembled mechanism with the planet cage uppermost and
pour about two teaspoonfuls of a good quality thin oil into the cage.
- Insert the assembled mechanism into the hub shell and screw up the
right-hand ball ring finger-tight only.
- Make sure that the marks put on the ball ring and the hub flange
before dismantling will register properly, and then screw up tightly.
- Fit the left-hand cone, washer and locknut in the arrangement noted
when dismantling, and adjust the hub bearing as described in
'The Fitting and Adjustment of Sturmey-Archer Hubs.'
- Fit any special washers noted when dismantling the hub. If the
sprocket has been removed from the driver, fit the outer dust cap over
the driver before replacing the sprocket, and see that the dust cap is
properly centred on the flange of the driver. Fit the sprocket and
spacing washers in the arrangement noted when dismantling and add the
circlip.
- Replace the wheel in the cycle frame and adjust the gear as
described in'The Fitting and Adjustment of
Sturmey-Archer Hubs.'
Back to Sturmey page

